How to Set Up a Multilingual Discord Server, Step by Step
Plan your languages, pick a channel layout, let members choose a language with Onboarding and auto-translate chat. A step-by-step multilingual Discord setup.
On this page
- Multilingual server setup at a glance
- Step 1: Choose which languages to support
- Step 2: Pick a channel structure
- Step 3: Create a language role for each language
- Step 4: Let members pick their language with Onboarding
- Step 5: Translate your rules, announcements and welcome info
- Step 6: Connect the languages with auto-translation
- Step 7: Add role translation and flag reactions for everyone else
- Step 8: Recruit moderators for each language
- Common mistakes to avoid
- Your multilingual server checklist
- FAQ
To set up a multilingual Discord server, start with one or two extra languages, create a role for each one and let members pick theirs with Discord's Onboarding. Then translate your rules and welcome info, and connect the languages with a translation bot so everyone can still talk together. Recruit at least one fluent moderator per language before you open the doors.
This guide walks through each step in order, with the exact Discord settings, the mistakes to avoid and a checklist at the end.
Multilingual server setup at a glance
- Choose your languages: your main language plus one or two more.
- Pick a channel layout: language channels, shared channels with translation, or a mix.
- Create a language role for each language.
- Ask "Which language do you speak?" in Onboarding, so new members get their role automatically.
- Translate your rules, announcements and welcome info.
- Connect the languages with auto-translation.
- Add role-based translation and flag reactions for everything else.
- Recruit moderators who speak each language.
Why bother? Because most of the world doesn't speak English. English has about 1.5 billion speakers, under 20% of the world's population according to Ethnologue, and CSA Research found that 76% of online shoppers prefer to buy products with information in their own language. On Discord, where about 70% of web traffic comes from outside the US, a server that only works in English quietly loses a lot of the people who join it.
Step 1: Choose which languages to support
The biggest mistake is launching five languages on day one. Discord's own guide to internationalizing a community is clear on this: if your server started in English, don't expand into too many languages at once. Agree on one language, preferably the most popular one in your server, and add more once you've found a structure that works.
To find out which language to add first, look at the people you already have:
- Which languages show up in chat when members talk among themselves?
- Who struggles with English when they join, and what do they switch to?
- What does a quick poll say? Discord's built-in polls are enough to ask "Which language would you like a section in?"
According to Discord's guide, the most commonly featured languages after English are German, French, Spanish, Turkish and Russian, but your community is what counts. A Brazilian-heavy Minecraft server needs Portuguese before it needs German.
Start with your main language plus one or two more. Each new language adds channels to watch, a moderator to find and content to translate, so grow only when the current languages are active.
Step 2: Pick a channel structure
There are three ways to organize channels in a multilingual server, each suited to different communities.
| Layout | How it works | Best for | Watch out for |
|---|---|---|---|
| Language channels | Each language gets its own category (ENGLISH, ESPAÑOL…) with its own chat |
Big communities where each language is active on its own | Splits the community, small languages feel empty |
| Shared channels + translation | Everyone chats in the same channels, a bot posts translations | Small and mid-size servers, 2–3 languages | Translations take space in busy channels |
| Hybrid (recommended) | Shared info channels and an international chat on top, a small category per language, all linked by translation | Most growing communities | A bit more setup |
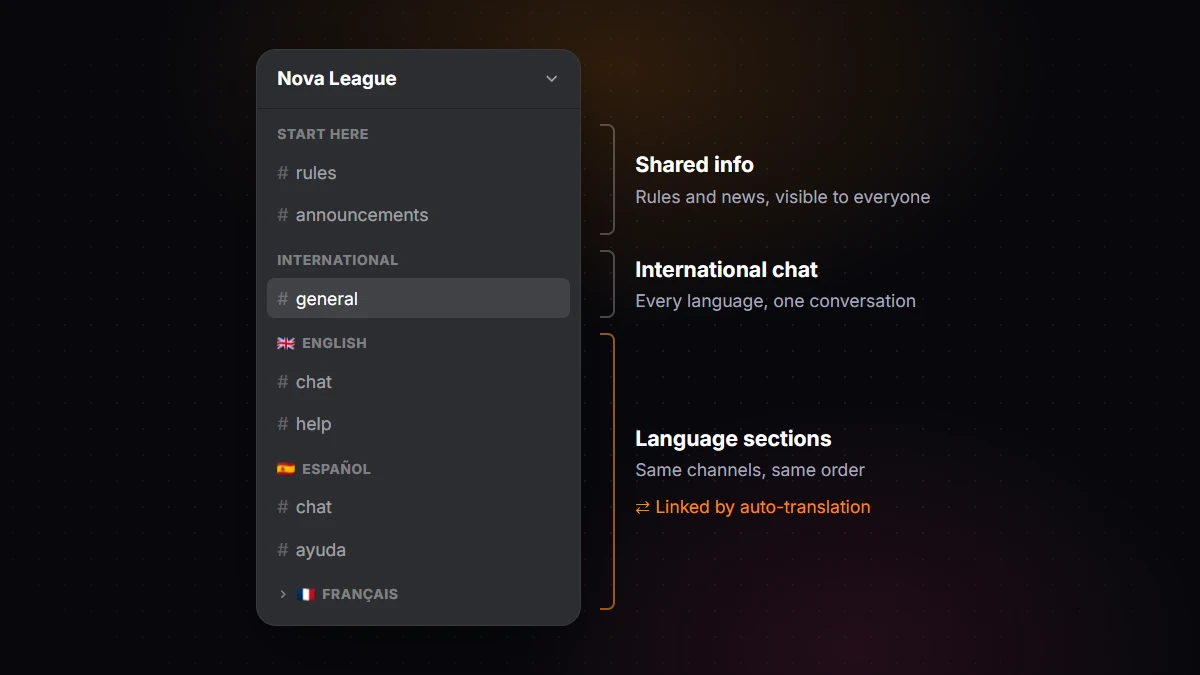
Whatever you choose, keep at least one international channel that everyone can read and write in. Discord's guide recommends having "at least one international general-chat before you split the server into each language", so members can talk to the whole community and not just their own section.
A few layout rules that save headaches later:
- Put the important channels at the top: rules, announcements and server info, visible to everyone.
- Give every language the same set of channels, in the same order: chat, help, media, and so on. It's easier to moderate, and it matters for translation too (more on that in step 6).
- Name channels in their own language:
#généralin the French category,#ayudain the Spanish one. It tells members at a glance that this space is theirs.
Step 3: Create a language role for each language
Language roles are ordinary roles named after languages. They tell you (and bots) who speaks what, and they're what Onboarding hands out in the next step.
- Open Server Settings → Roles and click Create Role.
- Name it after the language, written in that language: English, Español, Français, Deutsch, Português.
- Leave its permissions alone. A language role is a label, not a rank.
- Save, and repeat for each language.
Don't use country flags as the only label. Languages aren't countries: Spanish is spoken across Spain and most of Latin America, and a Brazilian member may not appreciate picking the Portuguese flag. The language's own name works for everyone.
Keep language roles low in your role list. The color of a member's name comes from their highest role that has a color, so language roles placed below your staff and rank roles won't override those colors.
Step 4: Let members pick their language with Onboarding
Discord's built-in Community Onboarding asks new members a few questions when they join, and each answer can give them roles and add channels to their channel list. It's the cleanest way to hand out language roles, with no bot needed.
Onboarding is available to Community servers. If yours isn't one yet, go to Server Settings → Enable Community and follow the setup (Discord asks for a verification level, the explicit media filter, a rules channel and a channel for community updates). You need the Manage Server and Manage Roles permissions, or Administrator, and you have to configure Onboarding from a computer, not the mobile app.
Then:
- Open Server Settings → Onboarding.
- Add Default Channels, the channels every new member sees. Discord requires at least 7, and at least 5 of them must let @everyone view and send messages. Your shared channels are perfect here.
- Add a question: "Which language do you speak?"
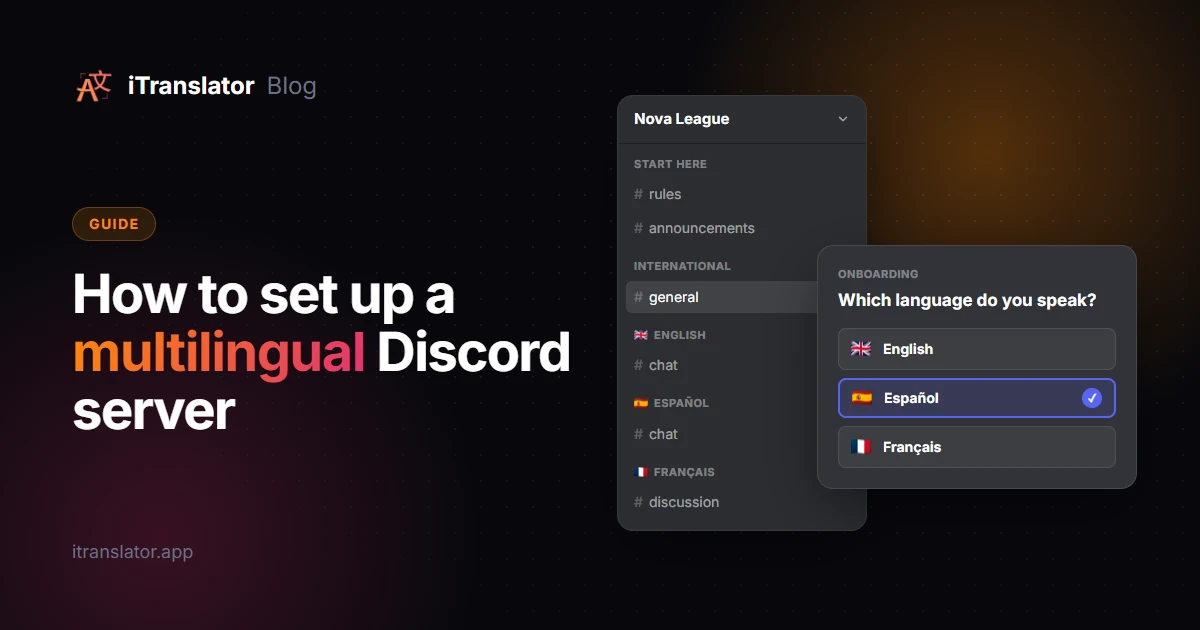
- Add one answer per language. For each one, write the title in that language, add a short description, then assign the language role and that language's channels.
- Set the question options. Ask it before members join, make it required, and leave multiple answers off so everyone picks a main language.
- Preview the flow as a new member, then enable Onboarding.
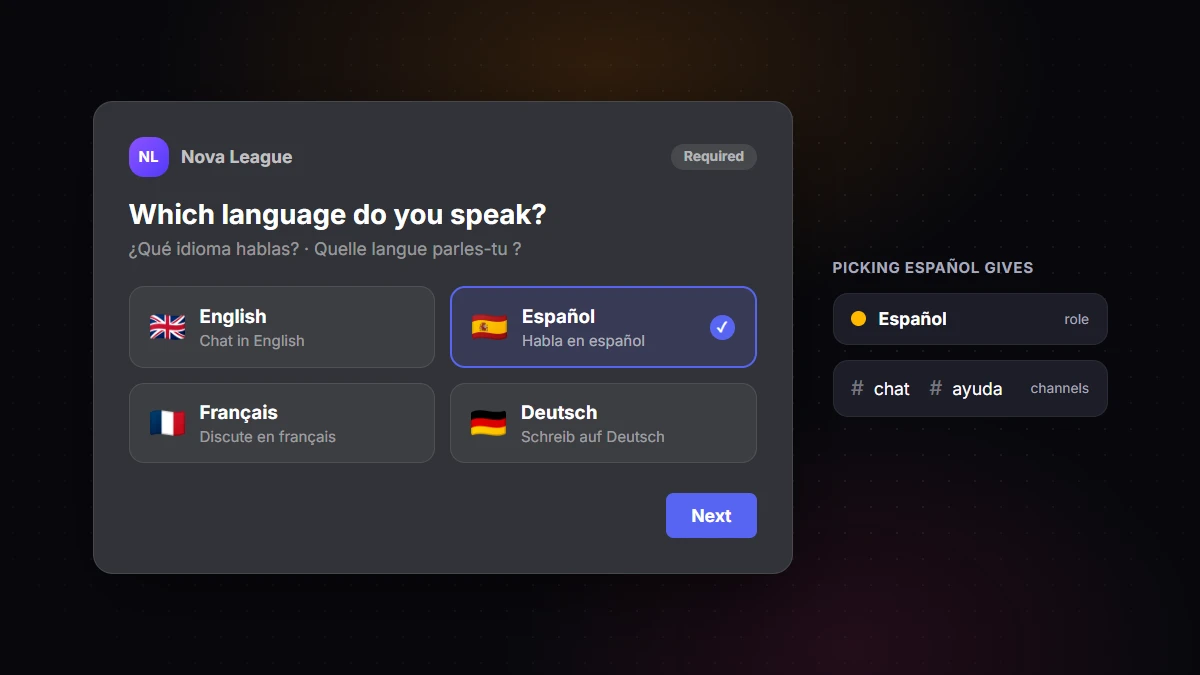
Onboarding shows your questions exactly as you typed them, in one language. Since this question is the one people answer before they know your server, write it in your main languages at once, for example "Which language do you speak? · ¿Qué idioma hablas?", and keep each answer to the language's own name.
Members can change their answer later from Channels & Roles at the top of the channel list. Members who were already in the server don't go through Onboarding, so post an announcement asking them to pick their language there.
Language channels open to all, or locked? An Onboarding answer adds channels to a member's list, but anyone can still find the others in Channels & Roles → Browse Channels. That's usually what you want. If you'd rather hide each language section from everyone else, make the category private (Edit Category → Permissions → Private Category) and add the language role to it.
Step 5: Translate your rules, announcements and welcome info
Discord's guide recommends translating "important parts like the rules and server information in every language you feature". These texts are short, rarely change and are the first thing newcomers read, so they deserve a proper translation.
- Rules: either one
#ruleschannel with a section per language, or a rules channel in each language category. Have a fluent member proofread the translation. Rules are close to a contract, and "the bot translated it" won't help when a moderator has to enforce them. - Welcome info: Onboarding includes a Server Guide with a welcome sign, 3 to 5 New Member To-Do's and Resource pages made from read-only channels. A resource page per language (a "Bienvenue" page, a "Bienvenidos" page) works well. Discord's Onboarding examples also advise against putting rules in your Onboarding questions, since members accept the rules separately after joining.
- Announcements: this is where automation pays off. Write the announcement once and let a bot post it in each language's announcements channel (see the next step).
Step 6: Connect the languages with auto-translation
Separate language sections solve one problem and create another: Spanish and English speakers stop talking to each other. As of 2026, Discord has no built-in translation for servers, so you need a bot to connect them.
iTranslator is the one we build, and it's used on 130,000+ servers. Its Auto-Translation feature takes every message posted in a source channel and posts the translation in a target channel, or directly under the original in the same channel.
- Add iTranslator to your server and keep the pre-selected permissions.
- Open the dashboard, log in with Discord and pick your server.
- Go to Auto-Translation, choose a source channel, a target channel and a target language, and save.
Two patterns cover most servers:
- Linked language channels.
#general-enis translated into Spanish in#general-es, and#general-esinto English in#general-en. That's two configurations, one per direction, and each side reads the whole conversation in its own language. - Translations under the original. Pick the same channel as source and target, and the translation appears right under each message. It's great for your international channel and for announcements.
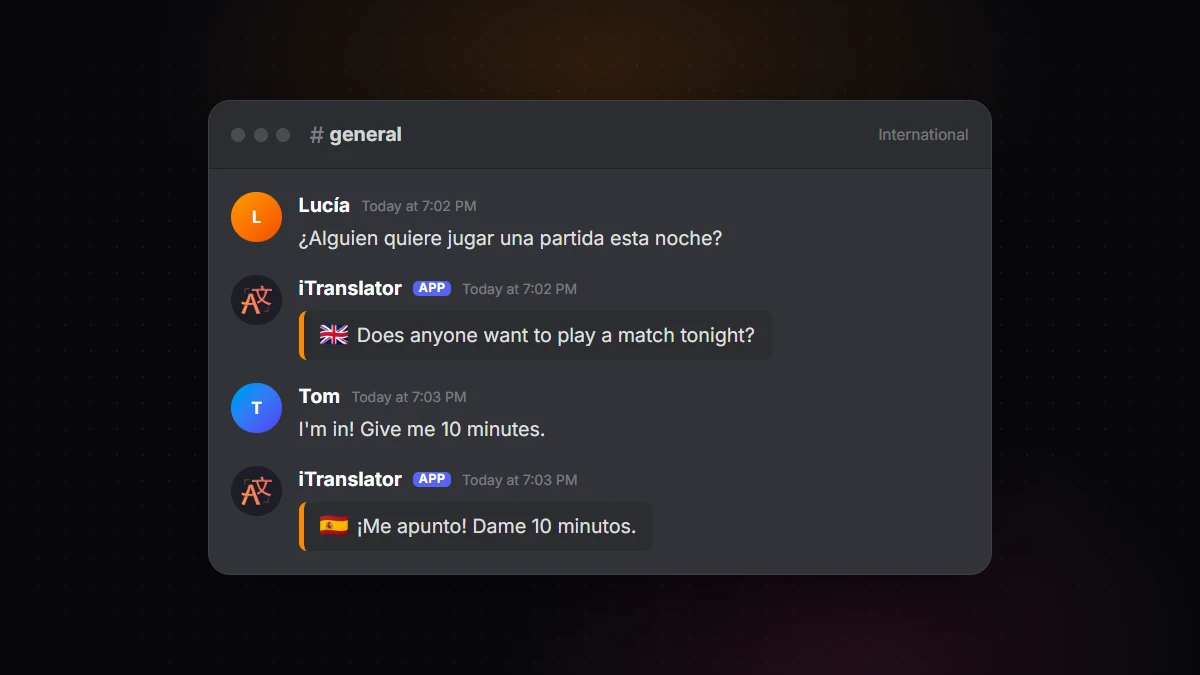
Keep the default Webhook message style and translations appear with the original author's name and avatar, so a translated channel reads like a normal conversation. Other useful options: ignore messages that only contain emoji, choose what happens with attachments, and delete translations automatically after a few seconds in busy channels.
How many configurations do you need? On the free plan, one configuration links one source channel to one target channel in one language, and you get up to 30. Linking one channel per language with all the others takes languages × (languages − 1) configurations: 6 for three languages, 12 for four, 20 for five. With Premium, a single configuration can target several channels and languages (every language is posted in every target channel), and you can use whole categories: a source category translates every channel inside it, and with one target category, channels are paired by their position. That's why keeping the same channel order in every language category pays off.
The bot needs these permissions in both the source and the target channels: View Channel, Send Messages, Manage Webhooks, Manage Messages and Embed Links. If you made language categories private in step 4, add iTranslator to them too.
Comparing bots? Our roundup of the best Discord translation bots covers the main options.
Step 7: Add role translation and flag reactions for everyone else
Auto-translation covers the channels you link. Two more features handle everything else.
Role-Translation translates members by role instead of by channel. Create a configuration for your Português role with English as the target, and everything members with that role write is translated into English, wherever they post. Since Onboarding gives out the role in step 4, a new Brazilian member is translated from their very first message. Set it up in the dashboard's Role-Translation page or with /translaterole create. The free plan includes 3 role configurations. To skip channels where no translation is needed, such as those of the Portuguese category, add no-roletranslate to their topics.
Flag reactions are the safety net. Any member can react to a message with a country flag, and iTranslator replies with the translation in that country's language. Enable it once from the dashboard (Flag-Reaction) or with /flagreaction toggle. Add no-translate to a channel's topic to turn it off there.
And for members who just want to understand one message, right-click it (long-press on mobile), then Apps → Translate Text. Our guide on how to translate messages on Discord covers every method in detail.
Step 8: Recruit moderators for each language
Translation lets moderators follow conversations in languages they don't speak, but it doesn't replace them. Slang, sarcasm and cultural context get lost, and a joke in one language can be an insult in another. Discord's guide insists on moderators who are native speakers, or at least fluent, in each language you add.
A few practices from Discord's guidance that work well:
- Make the right moderator easy to find: a language tag in their nickname, a slightly different color per language team, or a displayed role per language.
- Keep one shared, non-displayed staff role for all moderators, so no language team feels less important than another.
- Name a lead per language who gathers feedback from their team. It makes meetings across time zones much easier.
- Filter bad words in every language, not just English, in your AutoMod keyword lists.
Common mistakes to avoid
- Too many languages at once. Empty language channels look worse than no language channel at all.
- Splitting without a shared space. Without an international channel, you've built several small servers under one icon.
- Forgetting existing members. Onboarding only runs when someone joins. Tell current members where to pick their language.
- Machine-translated rules nobody checked. Automate chat, proofread rules.
- Missing bot permissions. If translations don't appear, check that the bot can see and post in both channels.
Your multilingual server checklist
Plan
- Main language plus one or two extra languages, based on who's already there
- A fluent moderator lined up for each language
Structure
- Rules, announcements and server info at the top, visible to everyone
- One international chat channel
- One category per language, with the same channels in the same order
Roles and Onboarding
- One role per language, named in that language, with no extra permissions
- Community enabled, Onboarding with at least 7 default channels
- A required "Which language do you speak?" question that assigns roles and channels
- An announcement telling existing members to pick their language in Channels & Roles
Content
- Rules and welcome info translated and proofread
- A Server Guide resource page per language
Translation
- iTranslator added, with its permissions in every linked channel
- Auto-translation linking the language chats and announcements
- Role-Translation for members who write in another language
- Flag reactions enabled as a fallback
FAQ
How do I make my Discord server multilingual?
Pick one or two languages to add, create a category and a role for each, and let members choose their language with a question in Discord's Onboarding. Then translate your rules and connect the language channels with a translation bot like iTranslator so the community stays together.
Can Discord translate my server automatically?
No. As of 2026, Discord has no built-in translation for servers or direct messages. You need a translation bot: with iTranslator, you can auto-translate whole channels, translate members by role, or let anyone translate a message with a flag reaction.
How many languages should a Discord server support?
Start with your main language plus one or two more, based on which languages your members already use. Discord's own guide recommends adding one language first and adding more only once you've found a structure that works.
Should I make a separate channel for each language?
Only if each language is active enough to fill its own channel. Smaller servers do better with shared channels and automatic translation, while larger ones usually combine an international channel with a category per language, linked by translation.
How do members choose their language on Discord?
With Community Onboarding, you add a question like "Which language do you speak?" whose answers give members a language role and that language's channels. Members can change their answer anytime from Channels & Roles at the top of the channel list.
Break the language barrier on your server
iTranslator translates every message automatically in 109+ languages, so everyone can chat in their own language. Set up in 2 minutes.
Add to DiscordFree to start · No credit card required